Getting a passport can be exciting — you’re planning trips, adventures, and maybe even life-changing journeys. But before you get to the fun part, there’s that tiny yet crucial hurdle: correct digital passport photo. One miss step here can send your application back faster than a plane taking off. So, let’s break it down, step by step, so you know exactly what the U.S. State Department expects and avoid common pitfalls.
Why Passport Photos Are So Important
You might think, “It’s just a photo!” but in reality, a passport photo is far more than a simple image. It serves as a critical security measure, ensuring that the person holding the passport is the person identified in the document. Border control officers, airline personnel, and immigration authorities all rely on this image to confirm your identity quickly and accurately. A single mistake—a blurry photo, incorrect lighting, or improper background—can cause delays, force a reshoot, or even result in your application being rejected. Essentially, your passport photo is the visual key that unlocks smooth international travel.
The importance of a passport photo extends beyond basic identification. It’s used in a wide range of official checks and security screenings. Automated facial recognition systems at airports and international borders compare your live image against the passport photo on file. If the photo is outdated, poorly taken, or doesn’t meet official guidelines, these systems may fail to recognize you, leading to additional scrutiny, questioning, or even denial of boarding. In this sense, the passport photo is not just a formality—it’s a preventive measure against identity fraud and travel complications.
Another critical aspect is the longevity of a passport. U.S. passports are typically valid for 10 years for adults, meaning that a single photo must remain a reliable representation of your face for a decade. Your appearance can change over time due to age, hairstyle, or other factors, but the State Department requires a clear, neutral image to provide a stable reference. Think of it like a snapshot frozen in time that officials can trust to verify your identity—even years after the photo was taken.
Finally, the passport photo serves as a first impression to authorities worldwide. Just as you wouldn’t show up to a formal event in casual or inappropriate attire, your passport photo presents your “official self” to global authorities. It communicates professionalism, seriousness, and accuracy. A poorly taken photo—crooked, shadowed, or with distracting elements—can create unnecessary hurdles in your travel journey. By understanding its importance and following guidelines meticulously, you can ensure a smooth, hassle-free process when traveling internationally.
Official U.S. Passport Photo Requirements
- The photo must be 2 x 2 inches (51 x 51 mm) in size.
- The head size should measure 1–1 3/8 inches (25–35 mm) from the bottom of the chin to the top of the head.
- Eye level must be between 1 1/8 inches and 1 3/8 inches from the bottom of the photo.
- The background must be plain white or off-white with no shadows, textures, or objects visible.
- Lighting should be even and balanced across the face; there should be no harsh shadows or bright spots.
- The subject must face the camera directly with a full front view.
- Both eyes must be open and clearly visible.
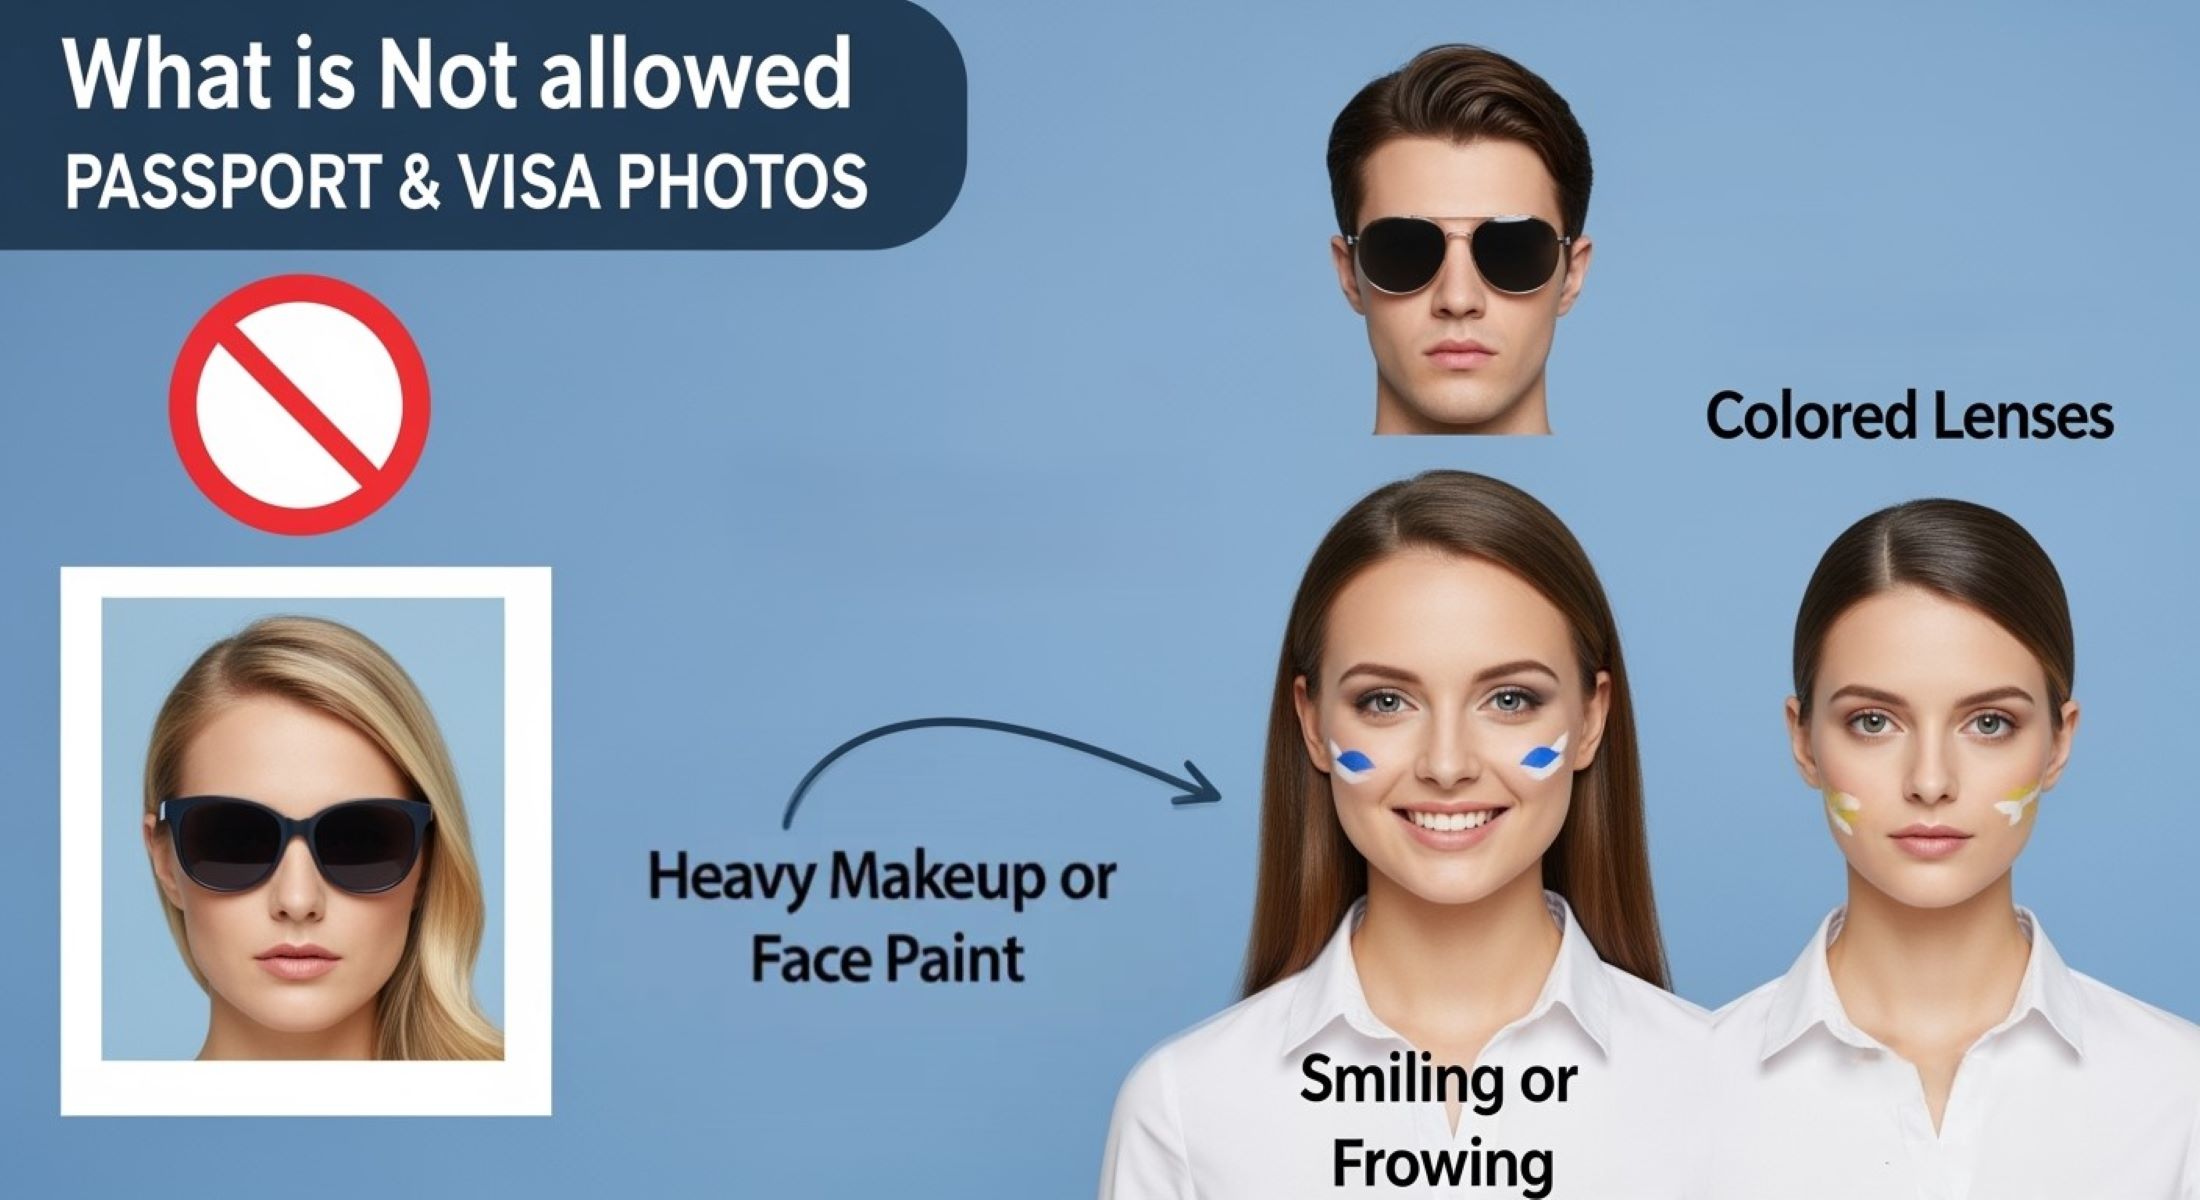
- A neutral facial expression is required, with the mouth closed—no smiling, frowning, or raised eyebrows.
- Normal daily attire should be worn; uniforms are not permitted.
- Religious head coverings are allowed only if they do not cover the face.
- Sunglasses, tinted glasses, hats, headphones, or any accessories covering the hairline or face are strictly prohibited.
- Glasses of any kind are generally not allowed unless a medical exception is documented with a signed statement from a doctor.
- The photo must be recent, typically taken within the last 6 months, reflecting your current appearance.
- The image must be in color, not black and white.
- No photo editing, filters, or enhancements are allowed.
- Ensure no shadows on the face or background; hair should not obscure facial features.
- The photo must be high resolution, with clear focus, no blurring, and proper exposure.
- The face should be centered in the frame and proportionally sized according to the head size requirements.
- Keep jewelry minimal and avoid any accessories that might obscure facial features.
- Maintain contrast between clothing and the background to ensure the face stands out clearly.
- Avoid selfies unless they strictly follow all official guidelines, as professional or studio-quality photos are preferred.
Common Mistakes in Passport Photos
| Mistake Category | Common Errors | Why It Happens | Consequence | Tips to Avoid |
| Wrong Size or Crop | Too zoomed-in, too zoomed-out, uneven cropping | Applicants don’t measure head size or crop incorrectly | Rejection for improper head size; delays in approval | Ensure head is 1–1 3/8 inches and centered in the frame |
| Poor Lighting or Shadows | Shadows behind head, uneven lighting, overexposed or underexposed photos | Using poor lighting or direct sunlight | Face details obscured; photo may be rejected | Use even lighting, avoid harsh sunlight or shadows |
| Facial Expression Errors | Smiling, frowning, tilting head | Attempting casual or selfie-style expression | Rejection for not maintaining neutral expression | Keep a neutral expression, mouth closed, and face directly forward |
| Background Problems | Colored walls, textures, patterns, shadows | Taking photos in non-compliant locations | Photo rejected due to improper background | Use plain white or off-white background with no objects |
| Accessories Mistakes | Hats, scarves, headphones, large jewelry, sunglasses | Forgetting to remove items or for style | Photo rejected due to facial obstruction | Remove all accessories covering the face or hairline |
| Clothing Issues | Uniforms, camouflage, clothing blending with background | Poor attire choice or matching background | Photo rejected; face not clearly visible | Wear normal daily clothing with contrast against background |
Special Cases for Passport Photos
Certain passport applicants require extra attention because standard rules may not always fit their situation. For example, taking a passport photo of babies and toddlers can be surprisingly tricky. Infants need to be awake with eyes open, lying flat against a plain white sheet or neutral background. Any hands, toys, or props in the frame can lead to rejection. Using a professional passport photo maker or a trusted online service can help parents capture a compliant, high-quality image without stress or repeated attempts.
People with disabilities may also face unique challenges when having their passport photos taken. Head coverings for medical reasons or personal necessity are generally allowed, but the face must remain fully visible. Wheelchair users should ensure that the background remains plain and unobstructed, so that their face is clearly identifiable. A careful setup with the help of a passport photo maker can ensure all accessibility needs are met while keeping the photo compliant with government regulations.
Medical exceptions are another area where special consideration is needed. For instance, applicants who must wear glasses for medical reasons may be allowed to keep them on, but a signed doctor’s note is required to validate the exception. Similarly, certain head coverings or other medical accessories may be permitted, provided they do not obstruct key facial features. Many professional passport photo maker services are well-versed in these exceptions and can provide guidance on capturing acceptable photos that meet official standards.
Finally, the key to successfully handling special cases is planning and preparation. Whether it’s a baby, an individual with a disability, or someone requiring a medical exception, the rules are strict but manageable. Using a reliable passport photo maker—either in-studio or online—ensures that every unique situation is addressed properly, reducing the risk of delays or rejections. Taking the extra step to get a correct photo the first time saves applicants time, stress, and the frustration of resubmitting their passport application.
Digital vs Printed Photos
- Digital passport photos must meet a minimum resolution of 600 x 600 pixels to ensure clarity.
- The maximum resolution for digital uploads is 1200 x 1200 pixels to prevent oversized files.
- Digital photos should be saved in JPEG format, which is the preferred format for most online applications.
- Ensure the digital image is in color, not black and white, to comply with official guidelines.
- Avoid any photo editing, filters, or enhancements in the digital image; it must represent your true appearance.
- The digital photo must have even lighting, with no shadows, glares, or reflections that obscure facial features.
- The face should be centered in the frame and meet the official head size and eye-level requirements.
- For printed photos, use high-quality photo paper to ensure sharpness and durability.
- Printed passport photos can be matte or glossy, as both are acceptable by the U.S. State Department.
- Avoid scanning old photos, as they may fail to meet the clarity and color standards; always take a new photo.
- Ensure printed photos have no creases, smudges, or folds, which can result in rejection.
- Both digital and printed photos should maintain proper contrast between your face and the background.
- Double-check that the photo meets all official passport photo guidelines, regardless of submission format.
- If using a passport photo maker, confirm they provide both digital and printed versions that comply with U.S. passport requirements.
- Keep a backup copy of your digital photo in case the original file is lost or corrupted during submission.
- Make sure the dimensions and proportions are accurate, whether printing at home or using a professional service.
- Review the final photo closely for any accidental shadows, reflections, or misalignments before submission.
Tips for Getting the Perfect Passport Photo
| Tip Category | Key Advice | Common Mistakes | Consequences | Additional Notes |
| Use a Professional Photographer | Visit stores, pharmacies, or online services that specialize in passport photos | Choosing untrained or generic photo services | Photo may be rejected due to non-compliance | Professional services know all official requirements and help ensure compliance |
| DIY With Caution | Use a tripod for stability, ensure even lighting, keep the background plain, measure head size accurately | Poor lighting, uneven crop, shadows, incorrect head size | Photo rejected or delayed; may require retake | Practice first and follow official guidelines closely |
| Avoid Editing Tools | Do not apply filters, retouch, or adjust colors | Attempting to enhance or alter the photo | Rejection due to alterations; non-compliance | Treat the photo like a legal document; it must reflect your true appearance |
| Verify Composition | Ensure face is centered, neutral expression, eyes open | Crooked head, tilted angle, partial face visibility | Photo may be rejected | Use a passport photo maker if unsure to get accurate alignment |
| Check Background | Plain white or off-white, no shadows or objects | Patterns, textures, shadows, cluttered background | Photo may be rejected | Proper background makes the face clearly visible to authorities |
| Recent Photo | Photo must be taken within the last 6 months | Using old photos or outdated images | Non-compliance; may delay application | Changes in appearance can cause facial recognition errors |
| Clothing & Accessories | Normal daily attire, minimal jewelry, remove hats or headphones | Wearing uniforms or accessories that obscure face | Photo rejected for facial obstruction | Contrast clothing with background for clear visibility |
Common Misconceptions About Passport Photos
Many passport applicants assume that a few small deviations won’t matter, but that couldn’t be further from the truth. One of the most common myths is that “smiling a little” is acceptable. In reality, passport photos require a neutral expression with the mouth closed and eyes open. Even a slight grin or smirk can lead to rejection, because facial recognition systems and border control officers rely on an exact, neutral depiction of your face for accurate identification. A neutral expression ensures consistency and prevents delays at checkpoints.
Another widespread misconception is that old photos are fine for passport applications. Many people think they can reuse a photo taken months or even years ago, but this is false. Passport photos must be recent, typically taken within the last six months, to reflect your current appearance. Changes in hairstyle, facial hair, or aging can make older photos unreliable for identification purposes. Using an outdated photo can cause your application to be delayed or rejected, so always ensure the image is current.
Some applicants also believe that black-and-white photos are acceptable, but this is not the case. Passport photos must be in full color, as color helps authorities verify facial features more accurately. A black-and-white photo may obscure skin tone, eye color, and other important details that are critical for proper identification. Ensuring your photo is in color is a simple step that eliminates one of the most frequent causes of rejection.
Finally, many people think selfies or casual smartphone photos can substitute for official passport photos. While modern cameras are powerful, selfies often fail to meet official standards for head size, eye level, background, and lighting. Passport photos must meet strict requirements to be accepted, and even minor deviations can result in a resubmission request. Using a professional service or a trusted passport photo maker ensures that your photo meets all specifications, saving time, money, and unnecessary frustration.