Document photos—whether for passports, ID cards, driver’s licenses, or visas—might seem simple, but getting them right can be trickier than you think. One wrong angle, a slight tilt, or a nervous frown can ruin your shot and mean retakes. Lucky for you, we’re breaking down everything you need to know about how to sit and look at the camera for document photos, step by step, so you can nail that professional, perfect look.
Why Getting Your Document Photo Right Matters
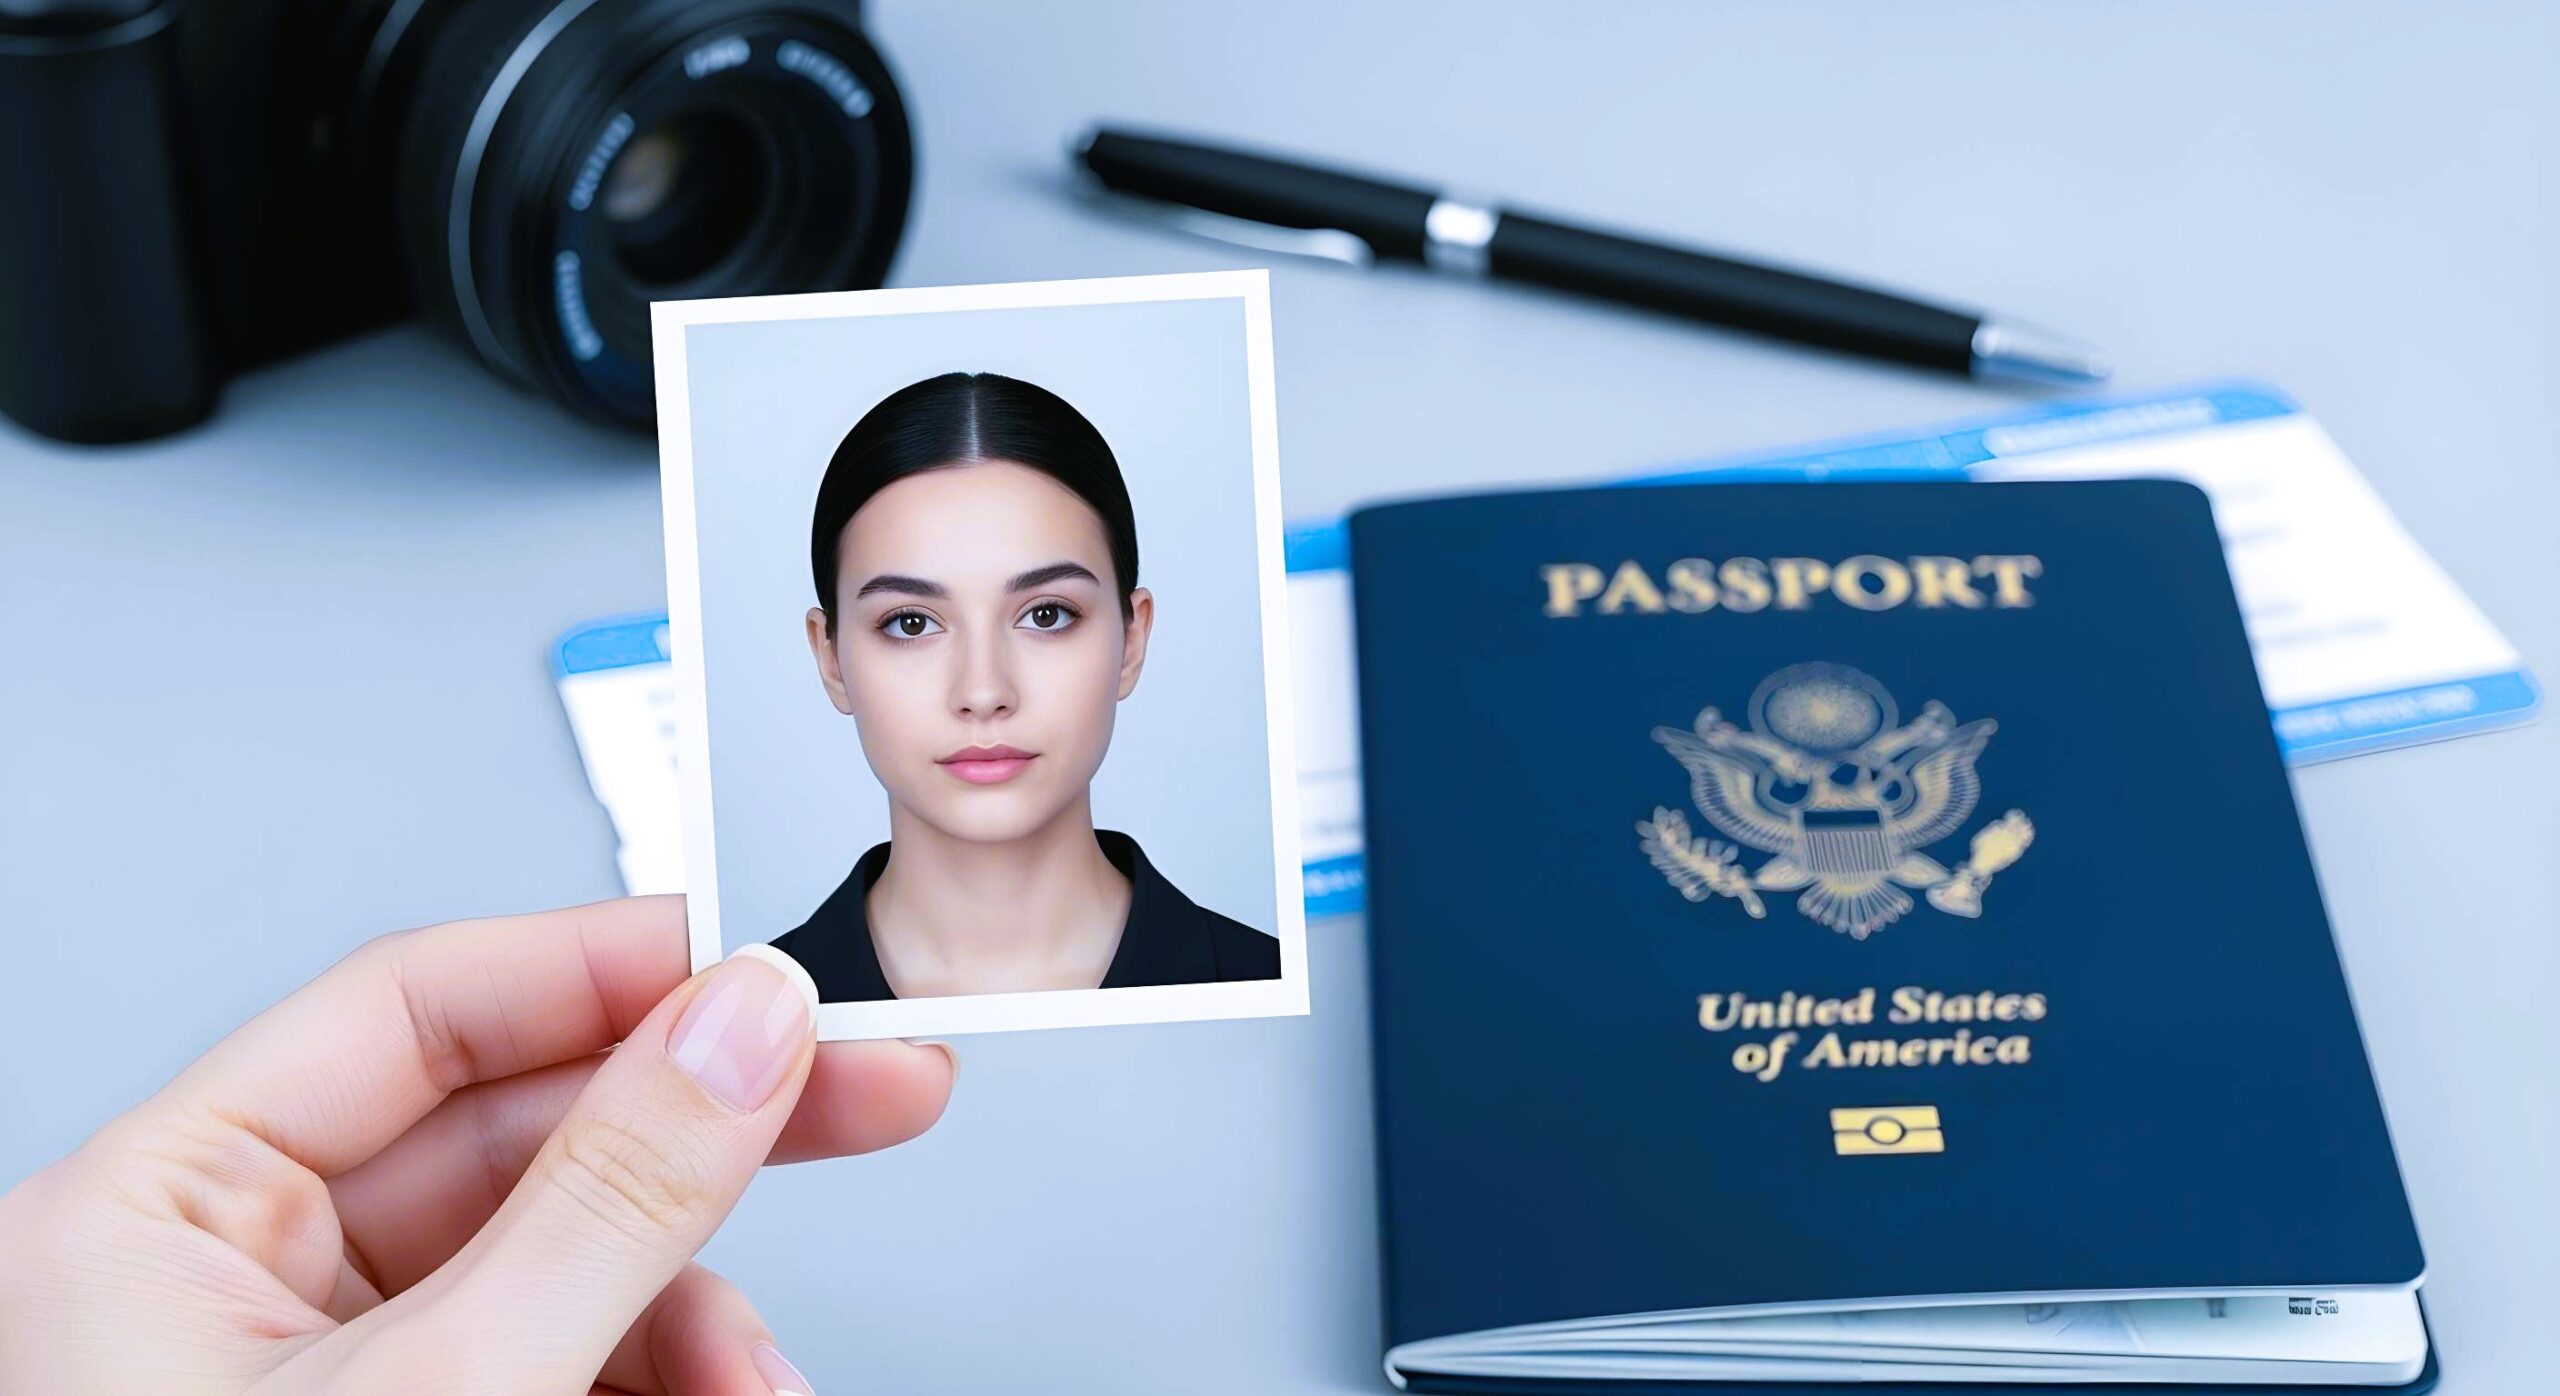
You might be thinking, “It’s just a photo—why fuss?” But the reality is that document photos carry a lot more weight than casual snapshots. These photos are used as official identification for passports, visas, driver’s licenses, and other important documents, meaning every detail matters. Even a small deviation from official requirements—like a tilted head, shadow on the face, or improper lighting—can result in a rejected photo. The standards for these images are strict because governments and institutions rely on them to verify your identity quickly and accurately. Think of it this way: your document photo is essentially your face’s official “signature,” so it needs to be precise and professional.
Mistakes in document photos don’t just cause minor inconvenience—they can lead to real-world complications. For instance, if your passport photo doesn’t meet the exact specifications for size, background, or facial expression, your passport application could be delayed for weeks. Similarly, visa applications can be rejected outright if your photo doesn’t comply with the guidelines, which might require you to start the process all over again. These setbacks can create stress, financial loss, and even missed travel opportunities. It’s a classic case of “an ounce of prevention is worth a pound of cure,” where investing a little time in preparation saves you a lot of trouble later.
Beyond official delays, getting your photo wrong can also mean unnecessary trips to photography studios or additional costs for reshoots. Many people underestimate how strict the rules are, only to discover at the last minute that their image doesn’t comply. A shadow across your face, glasses glare, or even wearing the wrong color top against the background can be enough to invalidate the photo. Each failed attempt not only costs money but also eats into your schedule, forcing you to rearrange appointments or take extra days off work to redo the photo. By being meticulous the first time, you avoid repeated frustration and unnecessary spending.
Finally, a proper document photo is about more than just compliance—it’s about projecting a clear, professional representation of yourself. Even minor issues such as squinting, a crooked posture, or uneven lighting can subtly affect how officials perceive your image. A well-prepared photo ensures that your face is clearly visible, evenly lit, and correctly aligned, leaving no room for doubt. In essence, taking the time to get your document photo right is a small effort that guarantees peace of mind, saves you from administrative headaches, and ensures that your identity is accurately captured for official purposes.
Understanding the Basics of Document Photo Requirements
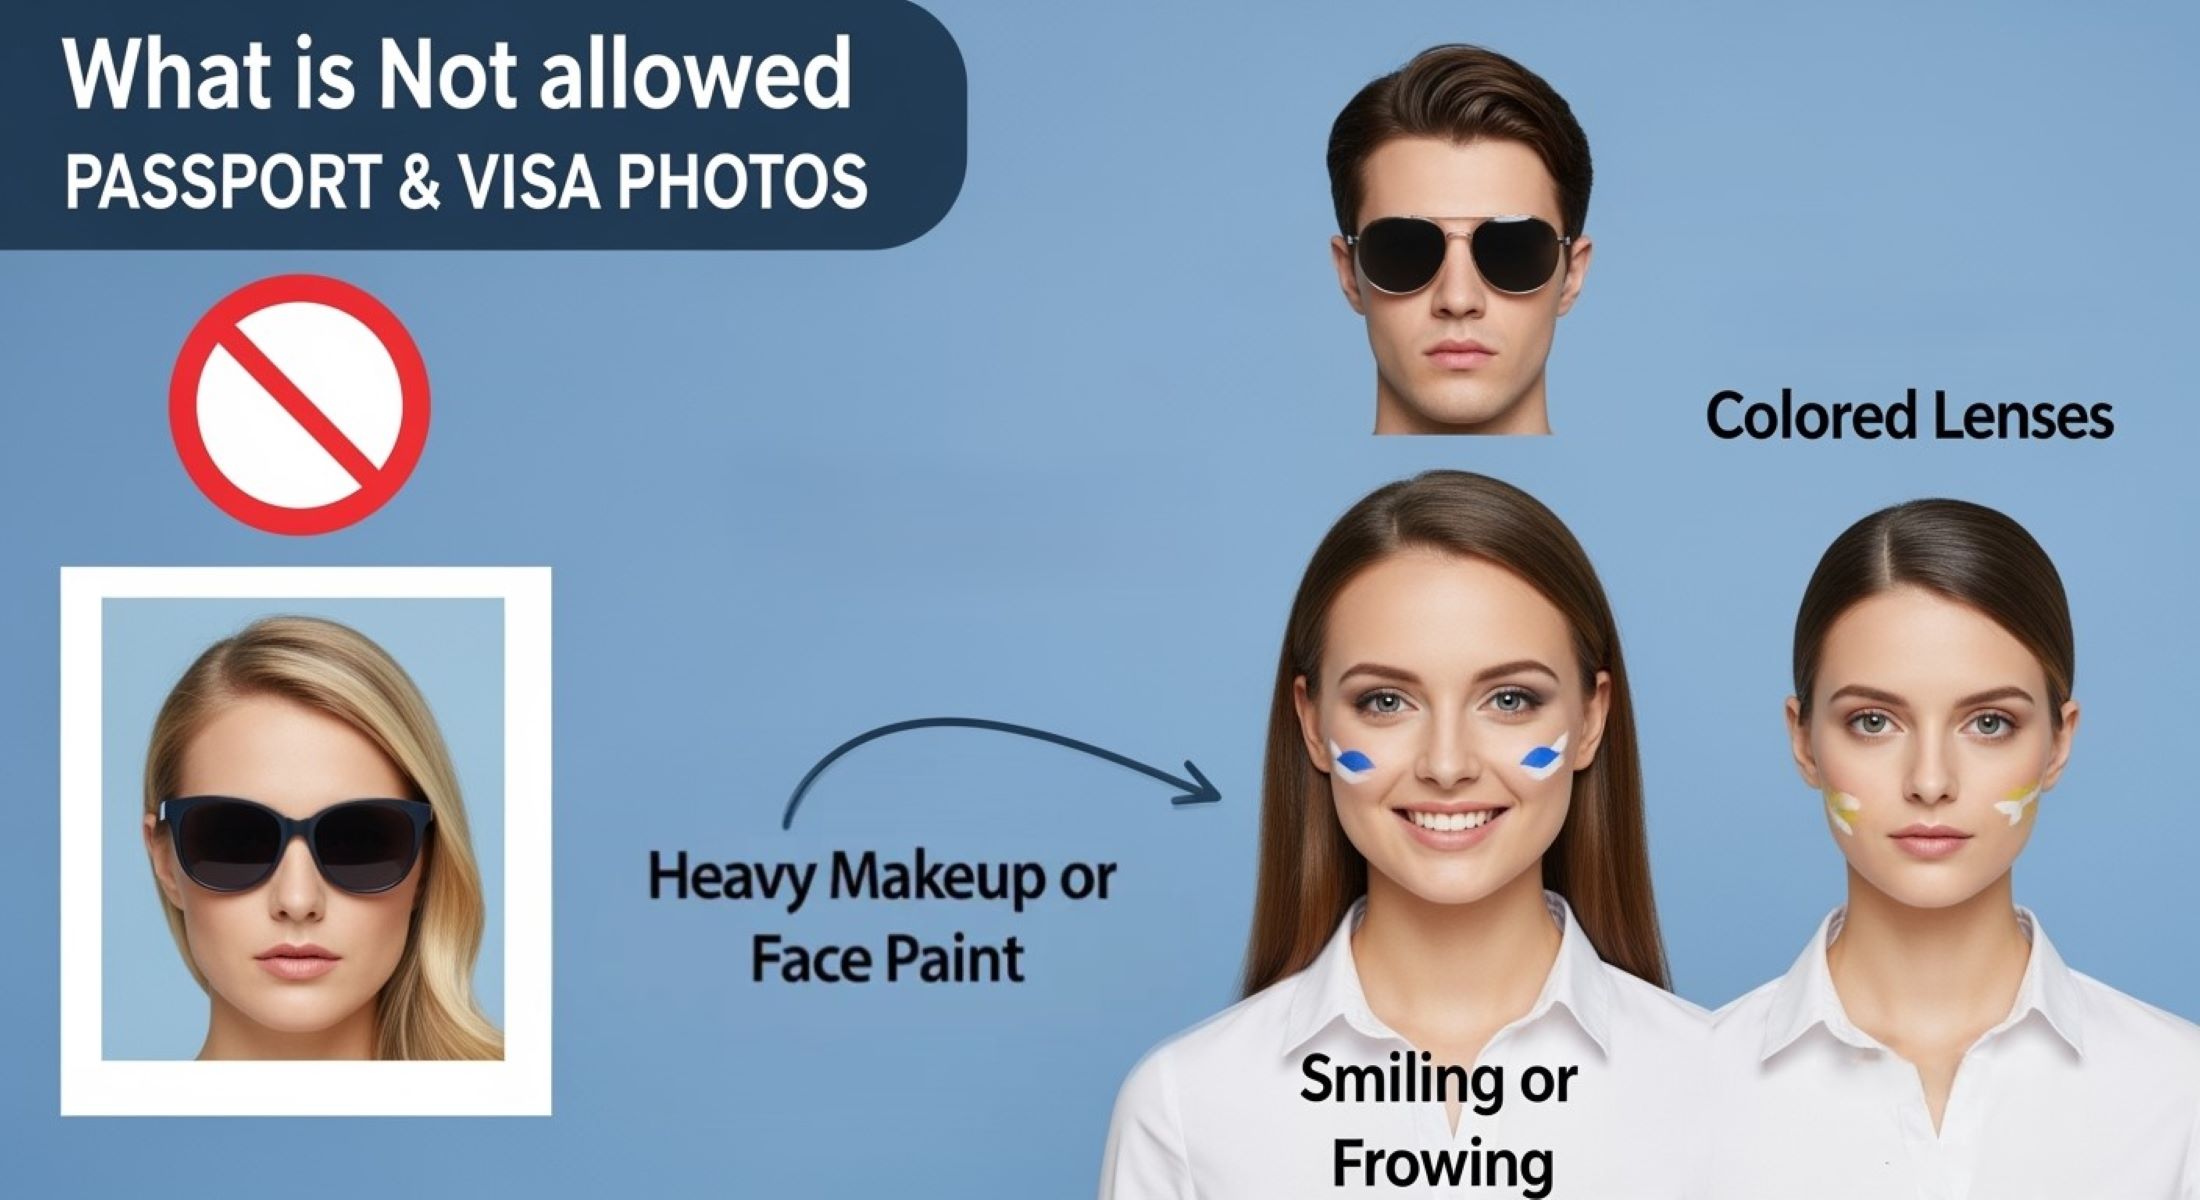
- Background must be plain, typically white or a very light color, with no patterns, textures, or distractions. This ensures your face is the focus and clearly distinguishable.
- Your face should be entirely visible, without any shadows, hair covering your features, or reflections that obscure your eyes, nose, or mouth. Clarity is key for identification purposes.
- The head must be centered in the frame and facing directly forward. Tilted or angled heads can distort facial recognition and often result in photo rejection. Neutral expressions are usually required, meaning no exaggerated smiles or frowns.
- Eyes must be open and clearly visible at all times. Avoid squinting, looking away, or blinking during the capture. This ensures your gaze is aligned with the camera lens.
- Accessories such as hats, sunglasses, or any items that obscure your face are prohibited. The only exceptions are for religious or medical reasons, but even then, the full facial structure must remain visible.
- Clothing should be plain, non-distracting, and ideally provide contrast against the background. Avoid busy patterns, logos, or colors that blend with the background to prevent your features from being lost in the image.
- Hair should be neatly arranged so it does not cover your eyes, ears, or forehead. Long hair may need to be tucked behind the ears or pinned back to maintain a clean look.
- Facial features must remain unobstructed. No hands, props, or objects can cover any part of the face. Full visibility of the eyes, nose, mouth, and jawline is required.
- Lighting must be even and consistent. Avoid harsh shadows, reflections, or glare on the face and background. Proper lighting highlights natural facial contours without distortion.
- The photo must be recent, typically taken within the last six months, to accurately reflect your current appearance. Significant changes in hairstyle, facial hair, or other features may invalidate the photo.
- The size and format of the photo must meet the specific requirements of the document. This includes pixel dimensions, print size, and resolution standards, which vary depending on the institution.
- Expression and posture must be neutral and relaxed. Standing or sitting stiffly, slouching, or tilting your head can all negatively affect the photo’s acceptability.
- Glasses, if worn, should not have tinted lenses, and glare on the lenses must be avoided. The eyes must remain fully visible through clear lenses.
- No shadows, reflections, or uneven lighting should be present on the background or face. Consistent brightness across the image is necessary for official acceptance.
- Finally, following these rules is only half the battle; your posture, facial expression, and attention to detail complete the process. Every element works together to ensure a clean, compliant, and professional document photo.
Position Yourself Correctly
| Step | Action | How to Do It | Why It Matters | Common Mistakes |
| Sit Up Straight | Maintain upright posture | Keep your back straight but relaxed, imagining a string pulling the top of your head toward the ceiling | Prevents slouching, ensures proportions of your face are correct, and gives a professional appearance | Slouching, leaning forward or backward, rounded shoulders |
| Face the Camera Head-On | Align your face directly with the camera | Turn your body straight toward the camera, keeping your head centered, eyes at “12 o’clock” facing forward | Ensures symmetry and compliance with official photo guidelines | Tilting your head, looking away, partial face visibility |
| Adjust Shoulder Position | Position shoulders evenly | Relax shoulders, drop them slightly to release tension, and ensure they are level | Prevents uneven framing and maintains a balanced look | Hunched shoulders, uneven height, tension causing awkward posture |
| Maintain Proper Distance | Sit an appropriate distance from the camera | Ensure your head and upper shoulders fill the frame, typically 1–2 feet away | Captures facial details clearly without distortion | Sitting too close (distorted features) or too far (too much empty space) |
| Keep Neutral Expression | Relax your facial muscles | Take a deep breath, close your mouth naturally, and keep eyes open, looking straight at the lens | Meets official photo requirements and conveys professionalism | Smiling too much, frowning, squinting, or showing tension in the jaw |
Mind Your Distance from the Camera
Distance from the camera is one of the most overlooked aspects of taking a proper document photo. Many people assume that as long as they’re in front of the camera, the shot will be fine, but even small variations can significantly affect how your face appears. Sitting too close can distort facial features, making your nose appear larger, your chin smaller, or your face asymmetrical. Conversely, sitting too far away can make your facial features appear smaller and less defined, which might result in a blurry or unprofessional image that fails to meet official requirements.
For standard ID or passport photos, the optimal distance is usually between one and two feet from the camera lens. This range allows the camera to capture your head and upper shoulders clearly while maintaining correct proportions. It ensures that every detail of your face—eyes, nose, mouth, and jawline—is visible without distortion. While the distance might vary slightly depending on the camera or lens being used, staying within this range generally produces the most accurate and compliant results.
A practical tip to get the distance right is to extend your arm straight out in front of you. Step back until your head and shoulders occupy most of the frame while leaving a small margin around your face. This simple visual guide helps ensure that your photo meets standard requirements without having to guess or constantly adjust the camera. It also helps maintain a balanced composition, keeping your face centered and evenly framed.
Finally, being mindful of distance isn’t just about technical compliance—it also affects how confident and natural you look in the photo. Sitting too close can create tension and make you feel cramped, while sitting too far can leave you looking small and disconnected from the frame. By finding the correct distance, you not only meet the official standards but also create a clear, professional, and flattering image that represents you accurately. This small adjustment makes a huge difference in achieving a successful document photo on the first try.
Master Your Facial Expression
- Keep your expression neutral at all times. A document photo is not meant to capture a smile or a personal mood; it should reflect a calm and professional appearance.
- Close your mouth naturally without forcing a smile or tightening your lips. Tension in the jaw or lips can make your expression appear strained or unnatural.
- Relax your jaw and facial muscles to avoid stiffness. A relaxed face ensures the photo looks professional and your features remain symmetrical.
- Avoid exaggerated facial expressions such as big smiles, frowns, or raised eyebrows. These are usually not compliant with official photo requirements.
- Keep your eyes open and alert, looking straight into the camera lens rather than at a screen or photographer. Eye contact with the lens ensures your gaze is correctly captured.
- Maintain relaxed eyelids. Avoid widening your eyes unnaturally, as this can create tension or an unnatural appearance in the photo.
- Take a deep breath before the photo to help calm your nerves and settle your expression. This simple step helps maintain a natural, composed look.
- Imagine you are looking at someone you trust or a neutral focal point; this technique can help reduce tension and create a more natural gaze.
- Pause briefly before clicking the photo to avoid blinking. Even a split-second blink can ruin a shot, so timing your breath and blink can make a noticeable difference.
- Practice slight variations of neutral expressions in advance. This allows you to find the most relaxed and natural pose while ensuring compliance with official guidelines.
- Focus on symmetry in your facial features. A small tilt or uneven smile can cause the photo to be rejected, so keeping your face level and balanced is essential.
- Avoid fidgeting or sudden movements during the capture, as even minor shifts can affect the alignment of your eyes and head in the frame.
- Remember that subtlety is key. Small adjustments in posture, facial tension, and gaze can greatly impact how professional and compliant your document photo looks.
- Consistency matters; ensure that the expression you choose can be maintained throughout multiple shots if retakes are necessary.
- Confidence shows in your facial expression. Feeling relaxed and prepared will naturally reflect in your gaze and mouth, resulting in a polished, acceptable photo.
Hair and Face Preparations
| Step | Action | How to Do It | Why It Matters | Common Mistakes |
| Hair Management | Keep hair off your face and forehead | Use hair clips, pins, or ties to secure loose strands; comb hair neatly | Ensures your facial features are fully visible and prevents shadows on your face | Hair covering eyes, forehead, or casting shadows |
| Avoid Distracting Hairstyles | Prevent styles that cast shadows or create uneven framing | Choose simple, tidy hairstyles that don’t block your face or ears | Maintains clarity and ensures compliance with official photo requirements | High-volume or messy hairstyles, bangs covering eyes |
| Secure Loose Hair | Use pins or clips if necessary | Tuck hair behind ears or use accessories to hold it in place | Keeps hair out of the face during capture, avoids repeated retakes | Forgetting to secure hair, causing last-minute adjustments |
| Facial Grooming | Minimal makeup | Apply light, natural makeup only; avoid heavy or shiny products | Prevents reflections and ensures an accurate representation of your features | Overuse of makeup that alters skin tone or creates glare |
| Facial Hair | Shave or trim neatly if applicable | Keep mustaches, beards, and sideburns well-groomed | Ensures facial features are clearly visible and symmetrical | Unkempt or uneven facial hair obscuring jawline or chin |
Clothing Choices
Even though the primary focus of a document photo is your face, what you wear plays a surprisingly important role in how the photo turns out. Clothing can affect the overall balance of the image, how your face is perceived, and whether your photo meets official standards. Wearing the wrong colors or patterns can cause your face to blend into the background or create visual distractions that draw attention away from your features. Choosing the right clothing ensures that your face remains the clear focal point, which is essential for official identification purposes.
One of the most common mistakes people make is wearing white tops when the background is also white. This lack of contrast can make the edges of your shoulders and neck disappear into the background, creating a washed-out appearance that may fail official requirements. Instead, opt for solid, medium- to dark-toned colors that clearly differentiate your body from the background. This simple adjustment instantly enhances clarity and ensures that your face stands out as the main subject of the photo.
Patterns, logos, and busy prints should also be avoided at all costs. These elements can distract the viewer’s eye, potentially obscure parts of your neck or shoulders, and create an unprofessional appearance. Even subtle stripes or checks can produce unintended shadows or visual noise that might interfere with automated photo verification systems used for passports and visas. Choosing plain, solid-colored tops is the safest approach, as it maintains a clean, professional, and universally acceptable look.
Finally, think about texture and fit when selecting your clothing. Wrinkled, bulky, or highly reflective fabrics can create shadows or highlights that interfere with the camera’s focus on your face. Well-fitted, neat clothing not only enhances the overall composition but also complements good posture and facial expression. By paying attention to your clothing choices, you’re taking another critical step toward producing a polished, compliant, and professional document photo that accurately represents you.